About this Blog

This blog is about all things that happen in my New England home and garden....if you are interested in decorating, gardening, cooking and entertaining...then follow me here to get inspired and get creative.

Tuesday, November 30, 2010

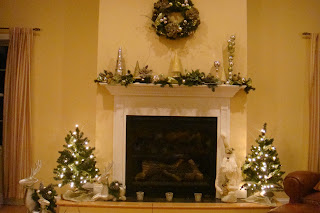
Holiday Mantel

I have completed my holiday mantel!!! The Christmas season has officially started for me. I always decorate my entire home first and then my tree. This year I've reinvented my decor with a new color scheme that I'm really excited about. When I began holiday decorating, I started with a base. I bought ornaments than were crystal, white, gold, and silver. I really like how these colors coordinate with any decor that is going on in my house as it is always evolving...as most of you know with your own homes! However, I do add a different color each year or couple of years to add some interest and coordinate with my home. In the past I've used red and copper (separately, not together). This year I wanted to go with chartreuse!! I LOVE green!! I wanted to use different shades of green to create depth and also, since I was kind of going with a monochromatic scheme, I added lots of textures to keep it interesting.
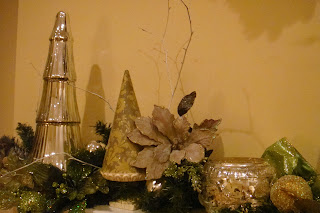
 I started with a base of green garland. I added some Christmas trees that I found at T.J. Maxx. I bought three green trees in different shades of green, all wrapped in a different textured paper as you can see closely in the about photo. Also, I added some mercury glass pieces that were very affordable.
 My mantel has a step from the floor level. I use this to place more things, in this case two miniature lighted trees on either end, and some reindeer that I sprayed with a metallic silver paint. I also decorated each reindeer with some greenery that I hot glued on their backs, and embellished the greens with flocked pine cones, silver ornaments and some green ribbon. You probably can't tell from this picture, but I used little round rhinestones as the eyes on my reindeer to give it a little bit of shine and glamour.


Here you can see how I've tucked in some other floral pieces from the craft store and my coordinating ribbon. I sprayed some branches that I found in my backyard and added then to the garland to give it an organic look. I added a mercury glass votive holder that I absolutely LOVE...also from TJ's.


 I added ornaments to the mantel in shades of silver and green. Some were shiny, some matte, and some glittered. Adding different textures is really important when you want to use colors that are similar.

 There's usually a large print above my mantel, but I replaced it with my DIY wreath. I've had this wreath for about 10 years. Each time I change my color scheme, I change out the pieces, the ribbon..etc. I do love my glue gun, but I like the idea of just using floral wire to attach things to a classic wreath, that way it can easily be changed out.
By now, you've probably noticed that I don't have any stockings. Well, I do have children and yes they do have stockings. We like to use the stockings in their bedrooms. They think it's "cool" that Santa Clause comes all the way up the stairs to their rooms to stuff their stockings and tuck them in when they're asleep.
Well...that's my mantel decor. I am linking to the Holiday Link party at The Lettered CottageCheck back with me to view the rest of my home holiday decor and my Christmas tree...when we get it that is. We've started a tradition of cutting down our own tree and we'll be doing that this weekend....I can't wait to share more with you!

Gina 

Tuesday, November 23, 2010

Decorative Wall Boards

Hi All,
I wanted to share something that I recently created. I had three canvas that I purchased at the craft store.


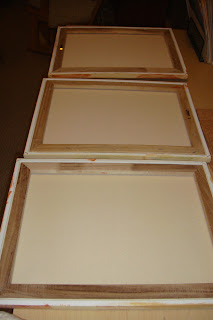
My original idea was to create a wall of homemade art with leftover wall paints, but it didn't exactly come out the way I wanted. So I was racking my brain to figure out what to do with the canvases and I came up with an idea to use them as message boards to place above my craft table/desk. I liked the idea that I had three because I could use each one for a different purpose or category...this type of OCD keeps my life in order. So, I plan on using one for project inspirations, one for reminders, and one to keep my kid's school notices on. So this is what I did. I had a package of cork squares that I bought at the office supply store. I wanted to use the cork because I wanted what I was pinning to adhere to something more substantial than the canvas itself. The square corks actually fit perfectly within  the wooden frame of the canvass as you see below. I just hot glued the cork down so that it wouldn't move around.


 After that was done, I needed to cover the canvasses with something. I was going to take a ride to the fabric store but then I remembered that I had an ivory tablecloth that I could no longer use for my kitchen table because it had a stain on one side of it. Perfect! I didn't have to go the fabric store and I was actually going to get away with basically making my boards ABSOLUTELY FREE!!! I was excited. The next step was to cut the fabric pieces and then wrap them around the canvasses and staple gun the ends to wooden frame.
 With this done, I was almost finished. I wanted to add a little something extra that would make my boards pop against my gray walls. I already have all black accents around my craft table so, I merely added a nice black ribbon to the top of each board. I used my staple gun once again to secure the ends to the back of the board, and hot glued it in three stops across the top underneath the ribbon. But it still needed something. With that thought I looked through my craft box and found some crystals that I had left over from another project. These are crystals that are flat on one side, almost like a button. I had only 5 and I had three boards...so I ended up putting one on each end on two of them, and one in the middle on the third one. I secured them with hot glue and the boards were ready to be hung!!! I am really pleased with how they came out. It took very little time to do and I was so happy to actually put those canvasses to some good use instead of laying on the shelf in my storage room.

Do you have an item that you've repurposed in some other way? 
I'd love to hear about it!!

Gina

Sunday, November 14, 2010

Double Duty Decor

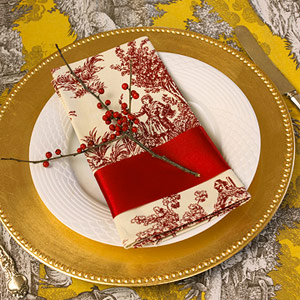
I love the idea of stretching my dollar with decor that can do double duty...here are some ideas via Better Homes and Gardens that I love, and can be used for Thanksgiving and through until Christmas.


There are many ways to stretch your buck when it comes to the holidays. Here are a few helpful tips:

1.) Choose basic neutral colors when picking china and linens for your table settings. I love to use ivory or white china and I use either ivory or white napkins. For a punch of color, in my opinion, green is also one of those colors that's a neutral. Green and even brown go with almost everything.  You can of course add other colors to these basics and then you have your own festive twist on a very neutral palette. 

2.) You can't go wrong with natural materials. Anything that comes from nature can be used for the holidays. Branches, pine cones, flowers, greenery and stones are all examples of items that can be used for either Thanksgiving or Christmas decor. Best part is that you don't have to look any further than your own back yard.

3.) White or ivory candles are a must. You can't go wrong.

4.) Decorating with fruit. If it's in season and at the local grocery store, then use them. You get the most bang for your buck here because it's cheap, it's fresh, you can display it, and then you can eat it. Can't beat that. Cranberries, pomegranates, clementines, apples, pears...all come to mind when thinking about holiday fruit. 

5.) Have fun with it and try no to stress out. We can all get a little crazy around the holidays because we want our homes to be perfect for friends and family. Sometimes life doesn't allow us to spend countless hours decorating and preparing for the holidays. Just do what you can. If you don't have time to string all those Christmas lights outside, just put one single spotlight to shine on your front door. It's not the end of the world if it doesn't all get done. Remember, it's often the most simple things that create the most impact. 

Gina

Saturday, November 13, 2010

Fall Cleanup Woes...but not for long!

I don't know about you, but this time of year is sooo busy for me. After getting out of the lazy days of summer, we come into fall and jump right into school, sports, after-school activities, and yeah a social life when we get a chance. Before you know it, the weekends are taken up with fall cleanups that need to get done and holiday shopping. I would love to skip the fall cleanup altogether and jump right into the shopping, but reality and guilt set in at some point. I wish I had the same energy as I do when the first signs of spring hit and I am dying to get my hands in the dirt. But none the less, the last few weeks for me have consisted of cleaning up the outdoors before we see any signs of snow here in New England and before it gets too cold of course. I DON'T work in the cold. Don't get me wrong, I LOVE living in New England, but I can do without the extreme cold. I do love that the seasons change here, and for the most part we've had a great fall so far.
But as the last few leaves fall off the trees and as the air starts to get cooler,  I can start to rest easy and concentrate my attention on the indoors. Thanksgiving and Christmas become the next focus of attention for me. I really love this time of year because of the months of happenings that occur. Thanksgiving is a time of gathering with family, and eating comfort foods, and being thankful for those that matter most in our lives. 
Christmas is also all about family, but also for friends as well, as we will gather for open houses and Christmas parties. And who can forget New Year's...a time to ring in the coming year and celebrate the hope of good things to come!
I really do love this time of year. I can't wait to start all these preparations very soon. Of course I am also always on the look out for new ways to decorate and new and different meals to prepare. Every year I try to change things up a bit. I love to keep some things totally ritual and traditional because lets face it, we as people like to cling on to traditions as a sort of comfort and a way or remembering events and people in our lives. Creating these memories are what the holidays are all about. In the coming weeks I hope to share with you some of my holiday traditions and ideas, and I can't wait to hear and see what others out there are doing as well. 
So, I'll be posting some projects that I have been working on soon. Until then, have a great fall weekend. It's a beautiful and warm day today in New England...I'm going to get out there and enjoy it will I can!


Gina

Monday, November 1, 2010

The End of October

 Happy November 1st everyone! I am excited to get into Thanksgiving and Christmas mode.....but I had to add a few last photos from my end of October!
 The last clippings from the garden in a black bucket on the front porch.
 A "welcome" pumpkin that I found at a local "good stuff cheap" shop...It was originally a washed out yellow. I just painted it a copper color that I had in my craft box and it looks much better against my tan house.

 These are the pumpkin seeds from the pumpkins that I carved. I let them dry out and spiced them up...then I baked them and we had a nice snack after our trick-or-treating excursion....slightly sweet and slightly spicy!
 Of course....dark chocolate mini cupcakes with orange frosting and chocolate sprinkles. A staple in our household on Halloween. As if we need more sweets, but it wouldn't feel right to me if it were a holiday and I didn't bake something...it's strange, but it just has to be done.
And what a way to end the day after trick-or-treating....a nice hearty bowl of spicy minestrone soup! Yummy.